 Mateo Fuster-Fabra Pierre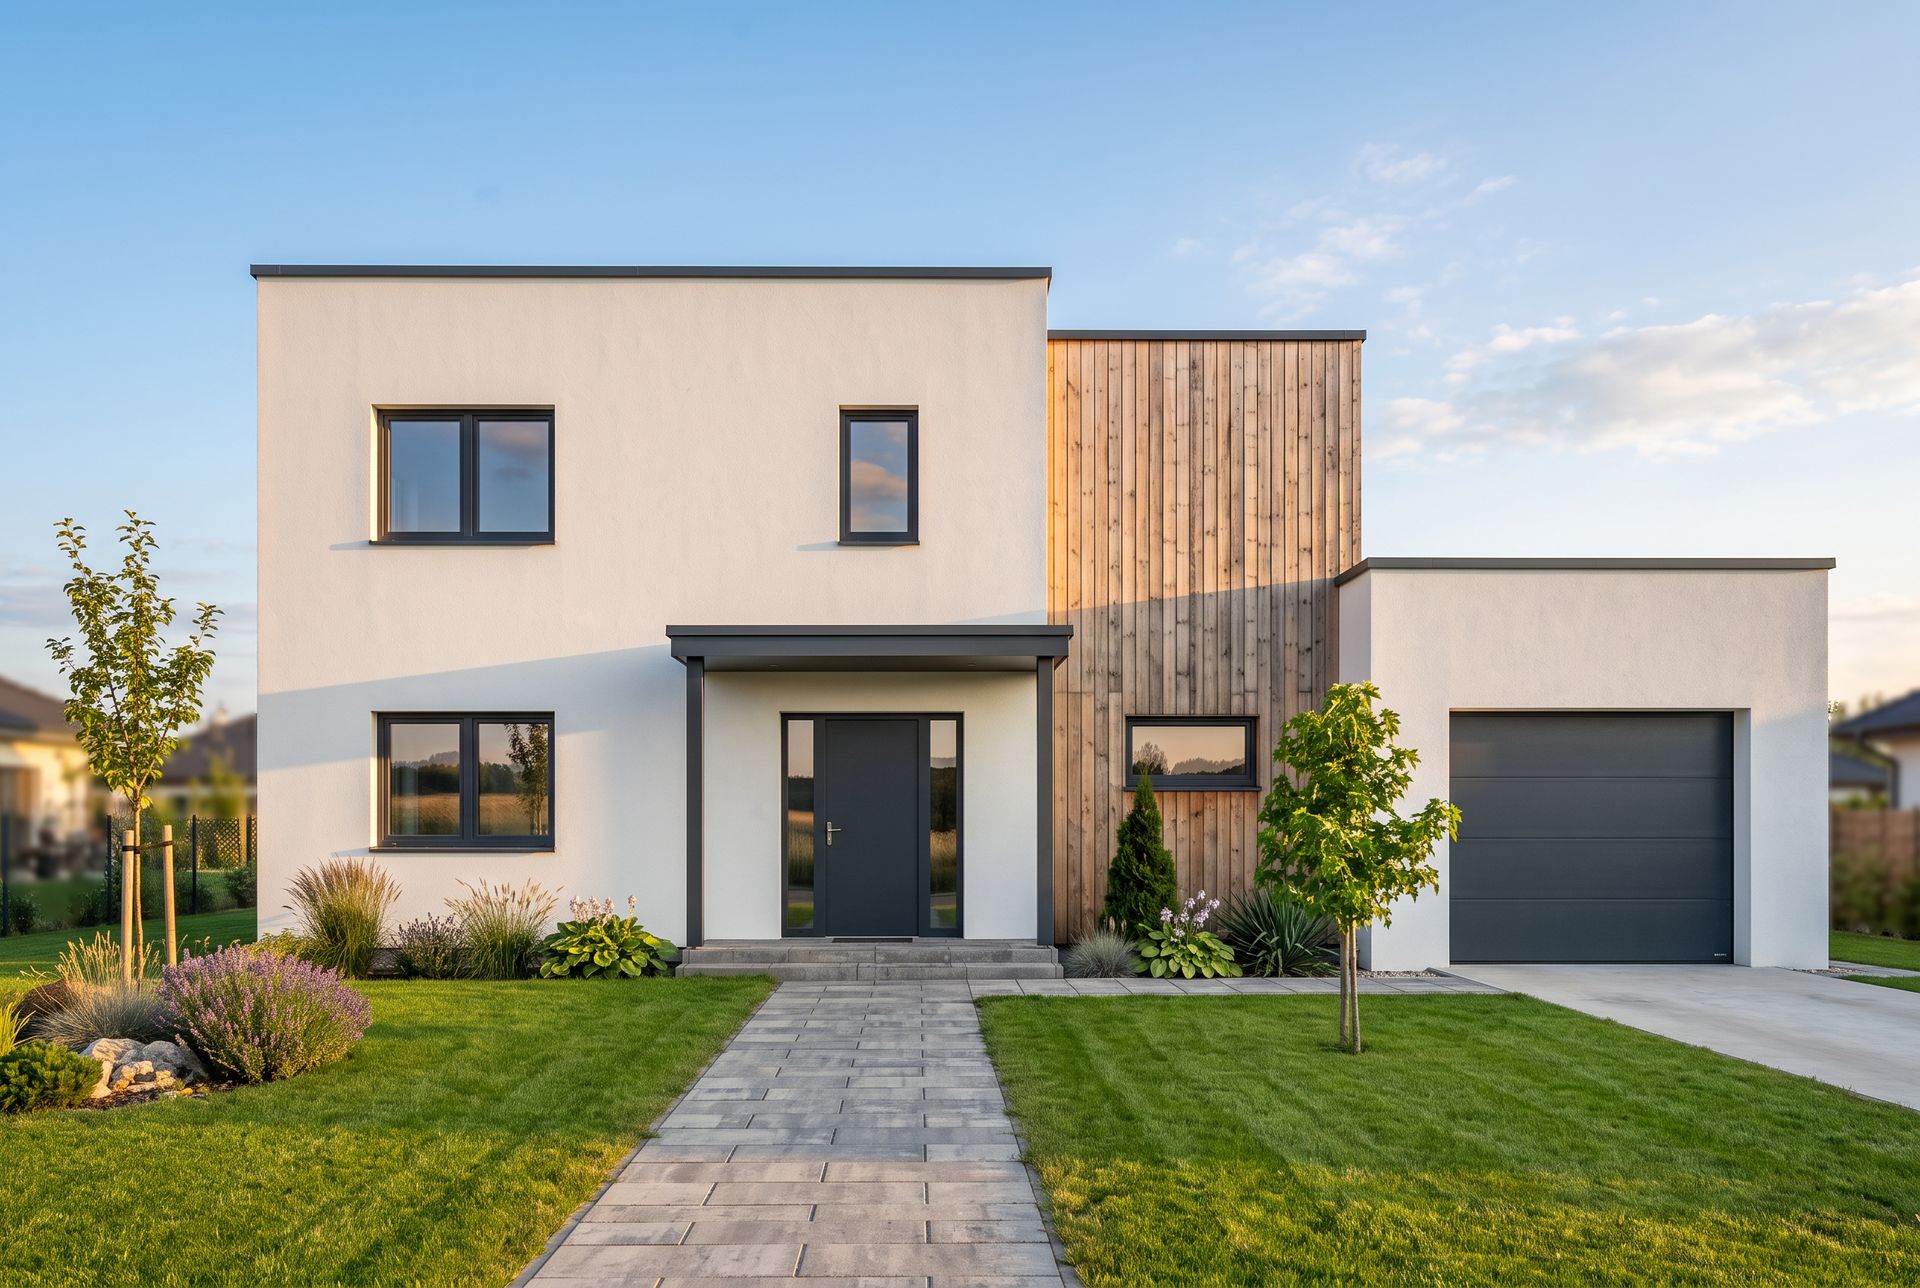
On this page
- Can AI really render a SketchUp model?
- What are my options for SketchUp AI rendering?
- How do I prepare my SketchUp view for AI?
- How do I render a SketchUp model with Lupa AI?
- Which prompts work best for SketchUp renders?
- How do I stop the AI from changing my design?
- How do I get the same look in every view?
- What else can I do with the render?
- What are the limits of AI rendering?
You finished the model in SketchUp, the client meeting is tomorrow, and the default view still looks like a foam maquette. V-Ray or Enscape would fix it, but that means a paid license, a strong GPU and hours of setup. This guide shows how to render a SketchUp model with AI in a few minutes: which screenshot to export, the exact prompts to use, how to stop the AI from changing your design, and what each option really costs.
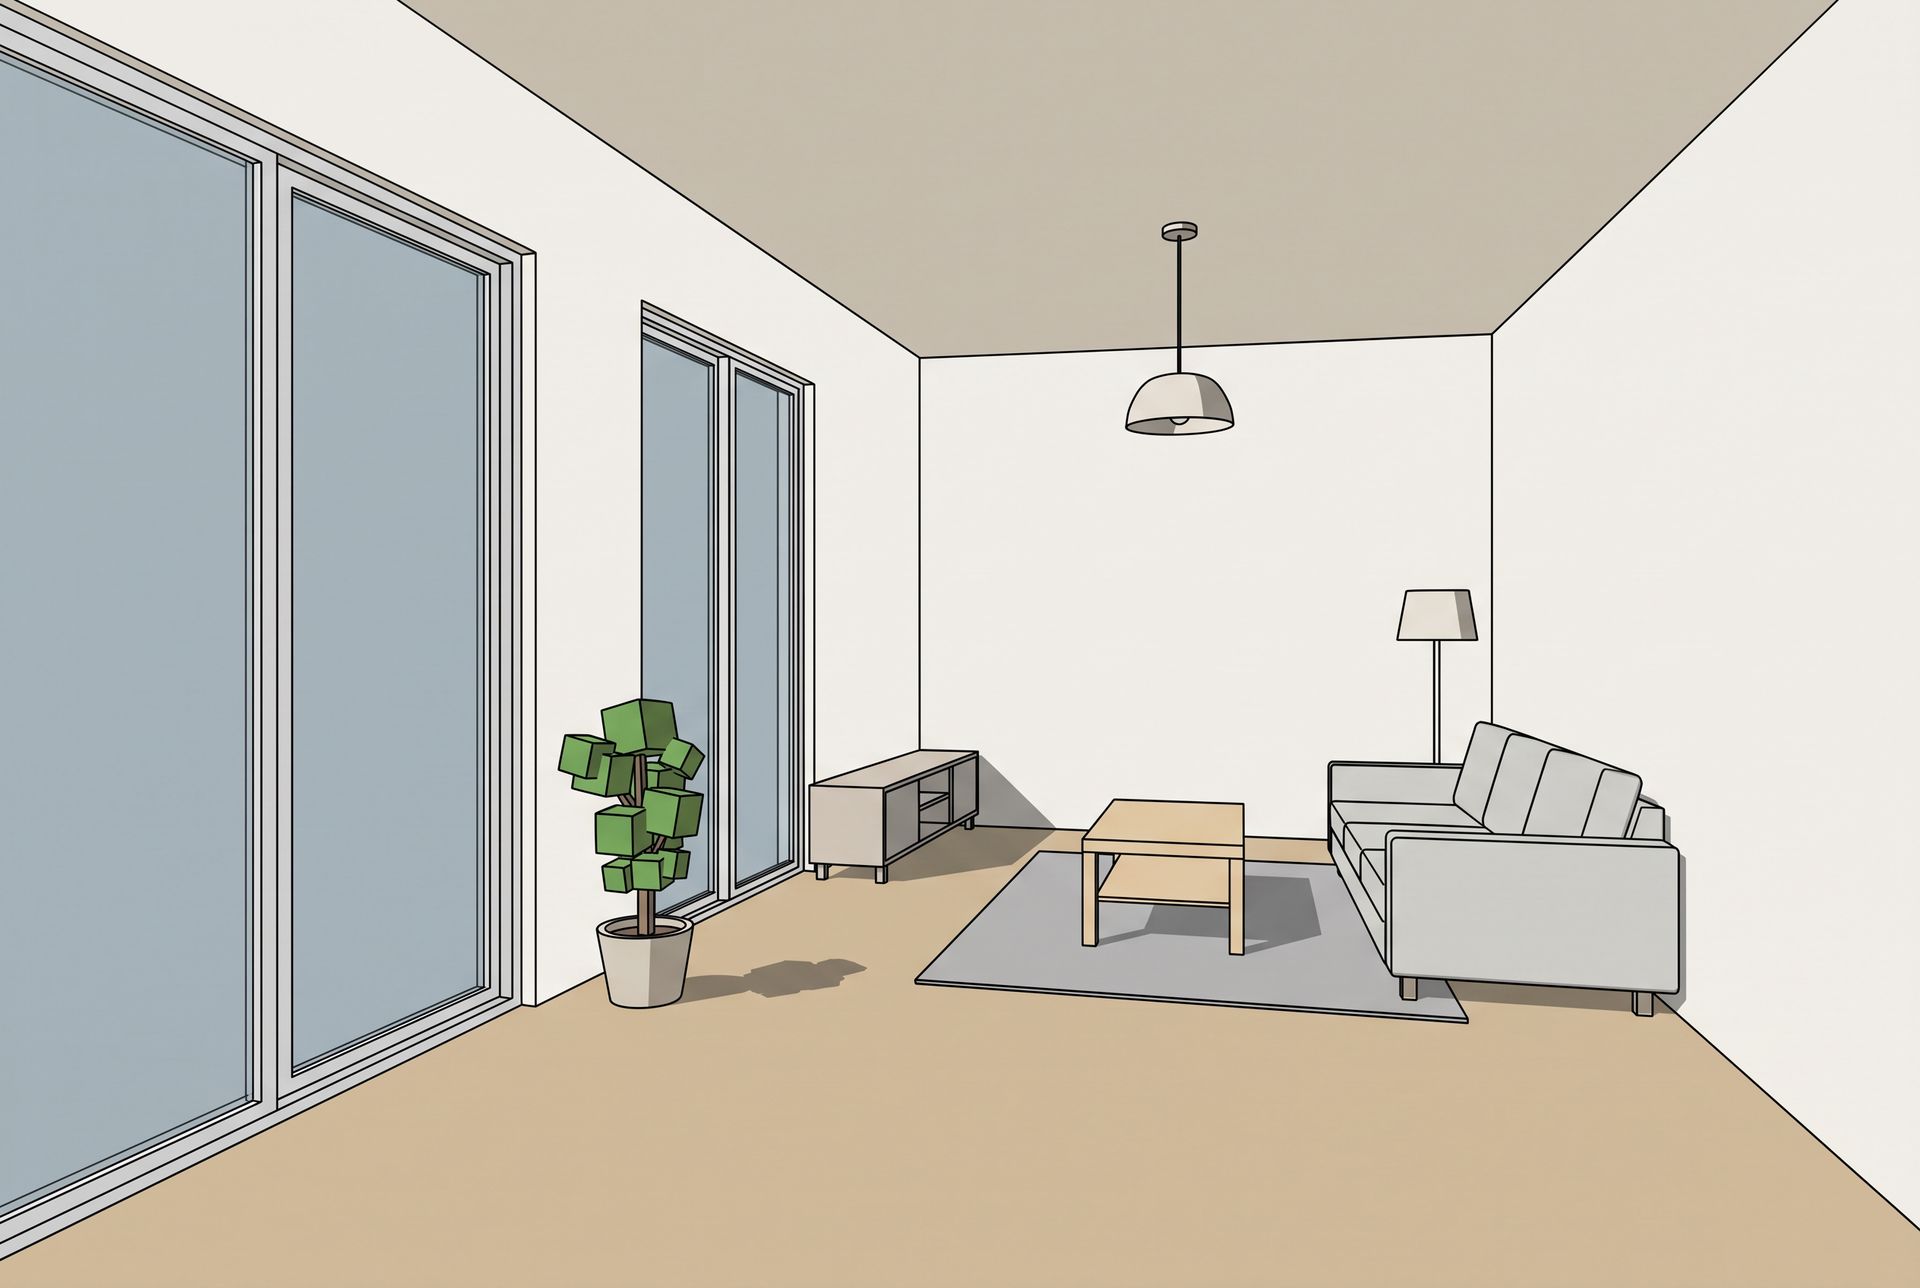
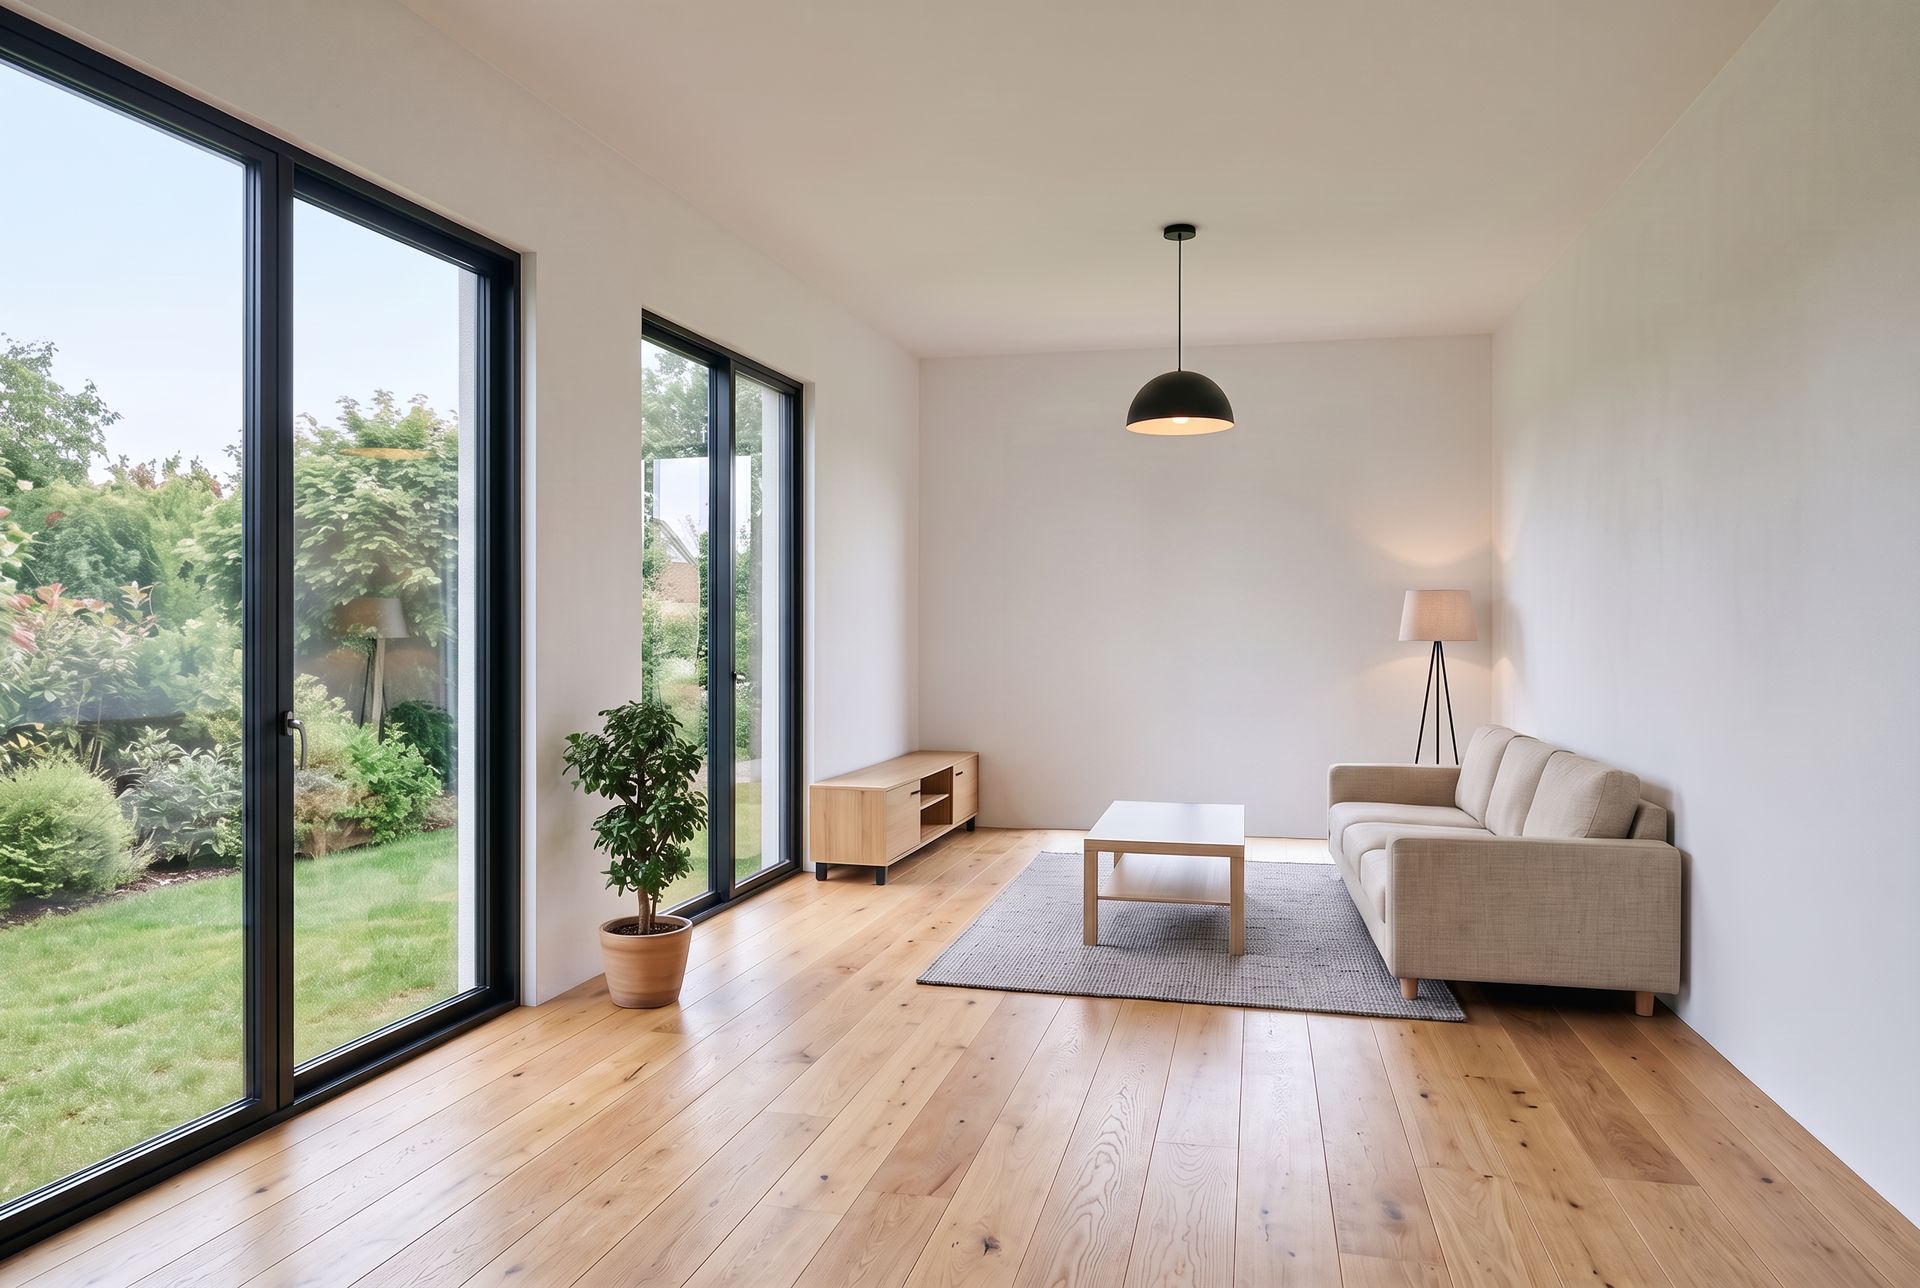
Example view created for this guide. Left: The SketchUp style export. Right: The result in Lupa AI Image Editing with Nano Banana 2, after one render and one correction, for 30 tokens in total.
Can AI really render a SketchUp model?
Yes. An AI renderer takes a screenshot of your model and repaints it as a photograph: real materials, soft shadows, reflections and daylight. You do not export geometry, set up lights or wait for a render engine. You work from a 2D image, so the result depends on two things you control: the view you export and the prompt you write.
What AI does well:
- Photorealistic materials, light and atmosphere from a plain SketchUp view
- Fast variations: Try oak and walnut, morning and evening, in minutes
- Early design stages, client presentations, competitions and social media
What it does not replace:
- Exact, repeatable renders of the same scene across a full project set
- Technical lighting studies with real fixtures and measured values
- Walkthroughs rendered from the 3D model itself (for motion, see Space Motion)
What are my options for SketchUp AI rendering?
There are three main routes. Pick the one that fits your workflow and budget.
| Option | How it works | Cost | Best for |
|---|---|---|---|
| SketchUp AI Render | Built into SketchUp, renders the active viewport | 10 credits per image; Go includes 100 credits a month, Pro 150, Studio 200 | Quick looks without leaving SketchUp |
| Traditional render engines (V-Ray, Enscape, D5) | Real 3D rendering with lights and materials | Paid license plus a capable GPU | Final, exact, repeatable project renders |
| Lupa AI | Upload a SketchUp screenshot, edit it into a photo, then upscale to 4K | From 10 tokens per image, 45 tokens for a 4K photoreal upscale | Presentation quality images, variations and video from the same image |
The built-in AI Render in SketchUp gives you around 10 to 20 images a month on the included credits (more with the SketchUp AI add-on). Lupa AI works outside SketchUp, so it also works with screenshots from Revit, Rhino, ArchiCAD or a hand sketch, and you can take the same image further: upscale it to 4K, relight it or turn it into a video.
How do I prepare my SketchUp view for AI?
The export is half of the result. A clean view gives the AI clear edges and surfaces to follow.
- Set the camera first. Go to Camera and choose Two-Point Perspective so vertical lines stay straight. Use a normal field of view (around 35 to 45 degrees); very wide angles distort and the AI keeps the distortion.
- Choose a simple face style. Shaded With Textures works best. Turn off sketchy edges and profiles, or set them thin. Heavy black lines can come back as dark seams in the render.
- Apply basic materials. Even flat colours help. A beige floor and white walls tell the AI where the floor ends and the wall starts.
- Turn on shadows. Enable Shadows and set the time of day you want. The AI reads the light direction from them.
- Hide what you do not need. Hide guides, axes, section planes and tags with placeholder objects.
- Export a large image. Go to File, Export, 2D Graphic and export a PNG at least 1920 pixels wide.
How do I render a SketchUp model with Lupa AI?
This workflow takes about five minutes and two tools.
- Open Image Editing and upload your SketchUp export.
- Pick the resolution. 2K is enough for a presentation and you can upscale later. Every example in this guide was made with Nano Banana 2 at 2K for 15 tokens per image (10 at 1K, 20 at 4K). The exact cost always shows on the button before you generate.
- Write your prompt. Describe materials, light and mood, and tell the model to keep the geometry. Copy one of the prompts below and adjust the materials.
- Generate 2 or 3 versions and keep the one that stays closest to your design.
- Open the Enhancer and upscale the result with the Realistic mode. It is built to turn a 3D render into a photograph: 45 tokens for 4K, or 75 tokens for 6K with ultra quality. It adds photographic detail and can also refine things like the view through the windows, so compare it with your edit before you send it to a client.
A full presentation image (2K edit plus 4K Realistic upscale) costs about 60 tokens.
Which prompts work best for SketchUp renders?
Start every prompt with an instruction to keep the design, then describe materials, light and camera. Here are three you can copy.
Interior, daylight (the prompt used for the living room at the top of this guide):
Turn this SketchUp model into a photorealistic interior photograph. Keep the exact geometry, layout, walls, windows, furniture positions and camera angle. Do not add or remove objects. Materials: light oak floor, white plaster walls, linen sofa, matte black metal details. View through the windows: a real green garden with trees, shrubs and a soft blue sky. Soft natural daylight from the windows, gentle shadows, realistic reflections. Shot on a full frame camera, 35mm lens, architectural interior photography.
Exterior, golden hour:
Turn this SketchUp model into a photorealistic architectural exterior photograph. Keep the exact building shape, proportions, front door, porch, windows, garage and camera angle. Do not change the design. Materials: smooth white render facade with subtle texture, vertical natural larch wood cladding, dark anthracite aluminium window frames and front door, glass with realistic reflections of the sky and trees, grey stone paving path, concrete driveway. Landscaping: a lush green lawn, real young trees, ornamental grasses and flowering shrubs along the facade, neighbouring gardens softly visible in the background. Warm golden hour sunlight from the side, soft long shadows, clear blue sky with a few light clouds. Professional architectural photography, full frame camera, 24mm lens, natural colors.
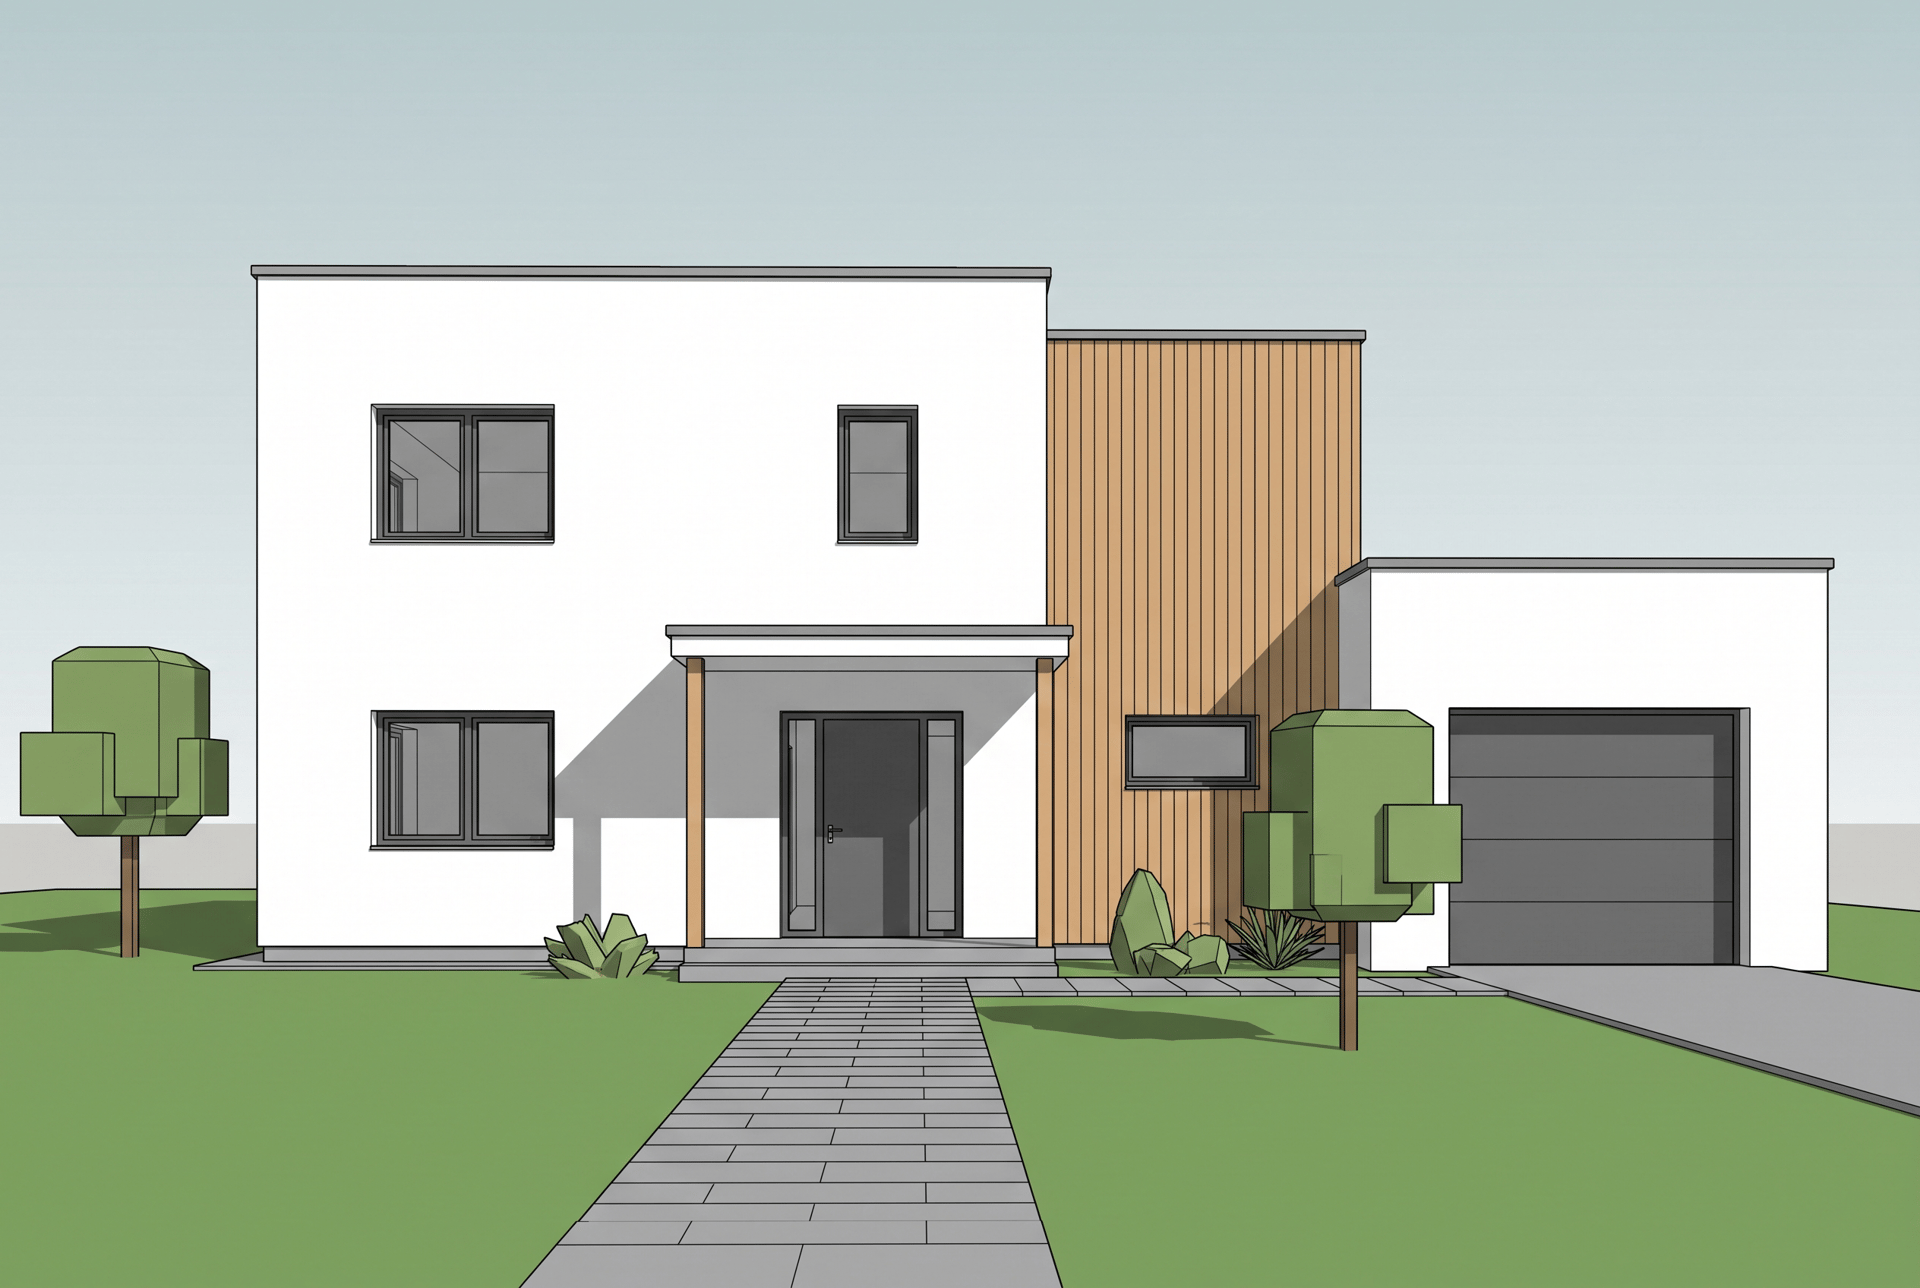
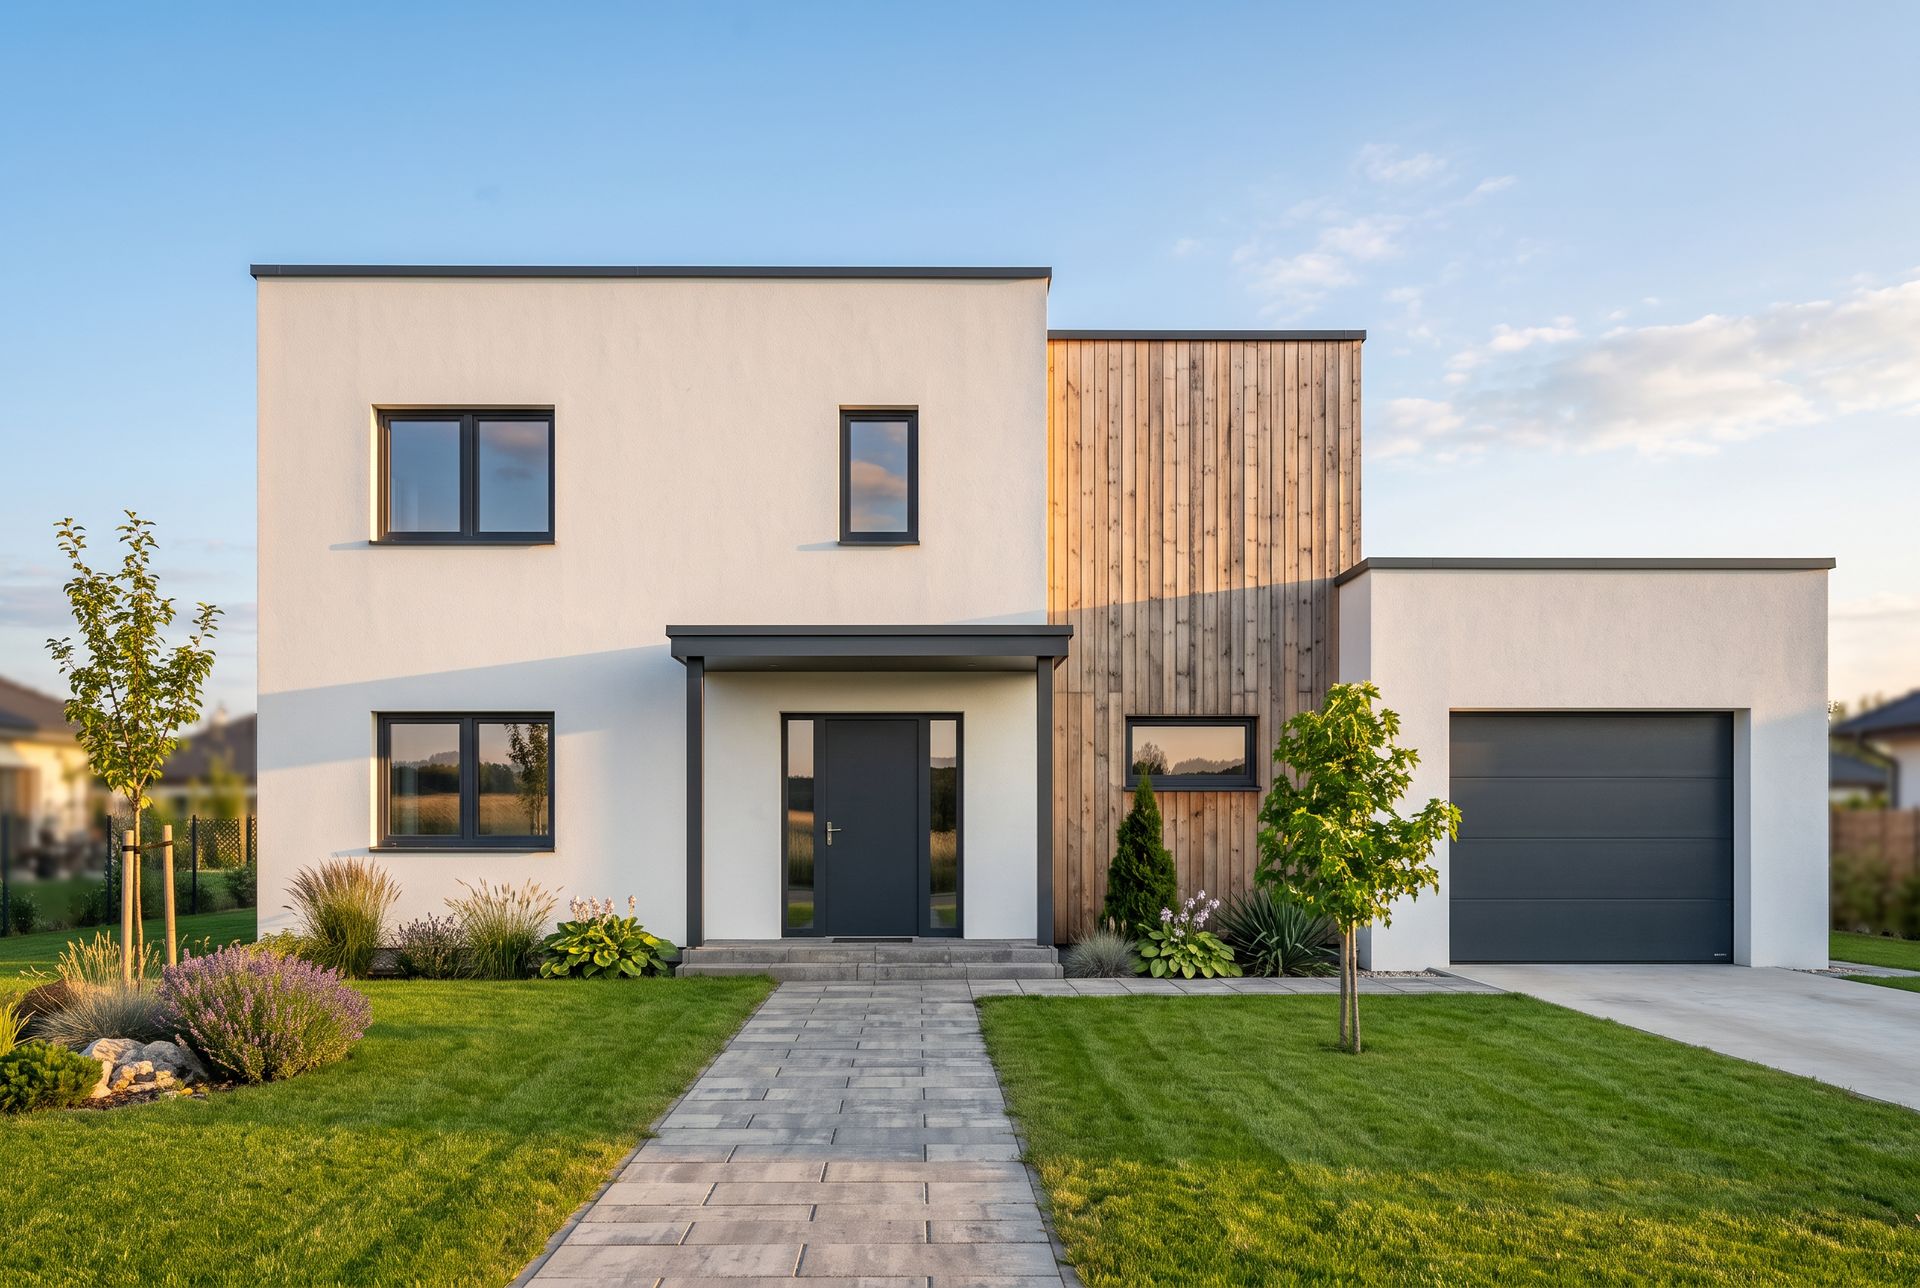
Result of the exterior prompt with Nano Banana 2 at 2K, 15 tokens. The front door, porch, windows and garage stay as modelled.
Kitchen, late afternoon:
Turn this SketchUp model into a photorealistic kitchen photograph. Keep the exact cabinet layout, island, appliances and camera angle. Do not add objects. Materials: matte sage green cabinets, white marble countertop with subtle veining, brushed brass handles, warm oak floor. View through the windows and the glass door: a real green garden with trees, shrubs and a soft blue sky at sunset. Warm late afternoon sunlight coming through the windows, pendant lamps switched on with a warm glow, soft shadows. Editorial interior photography.
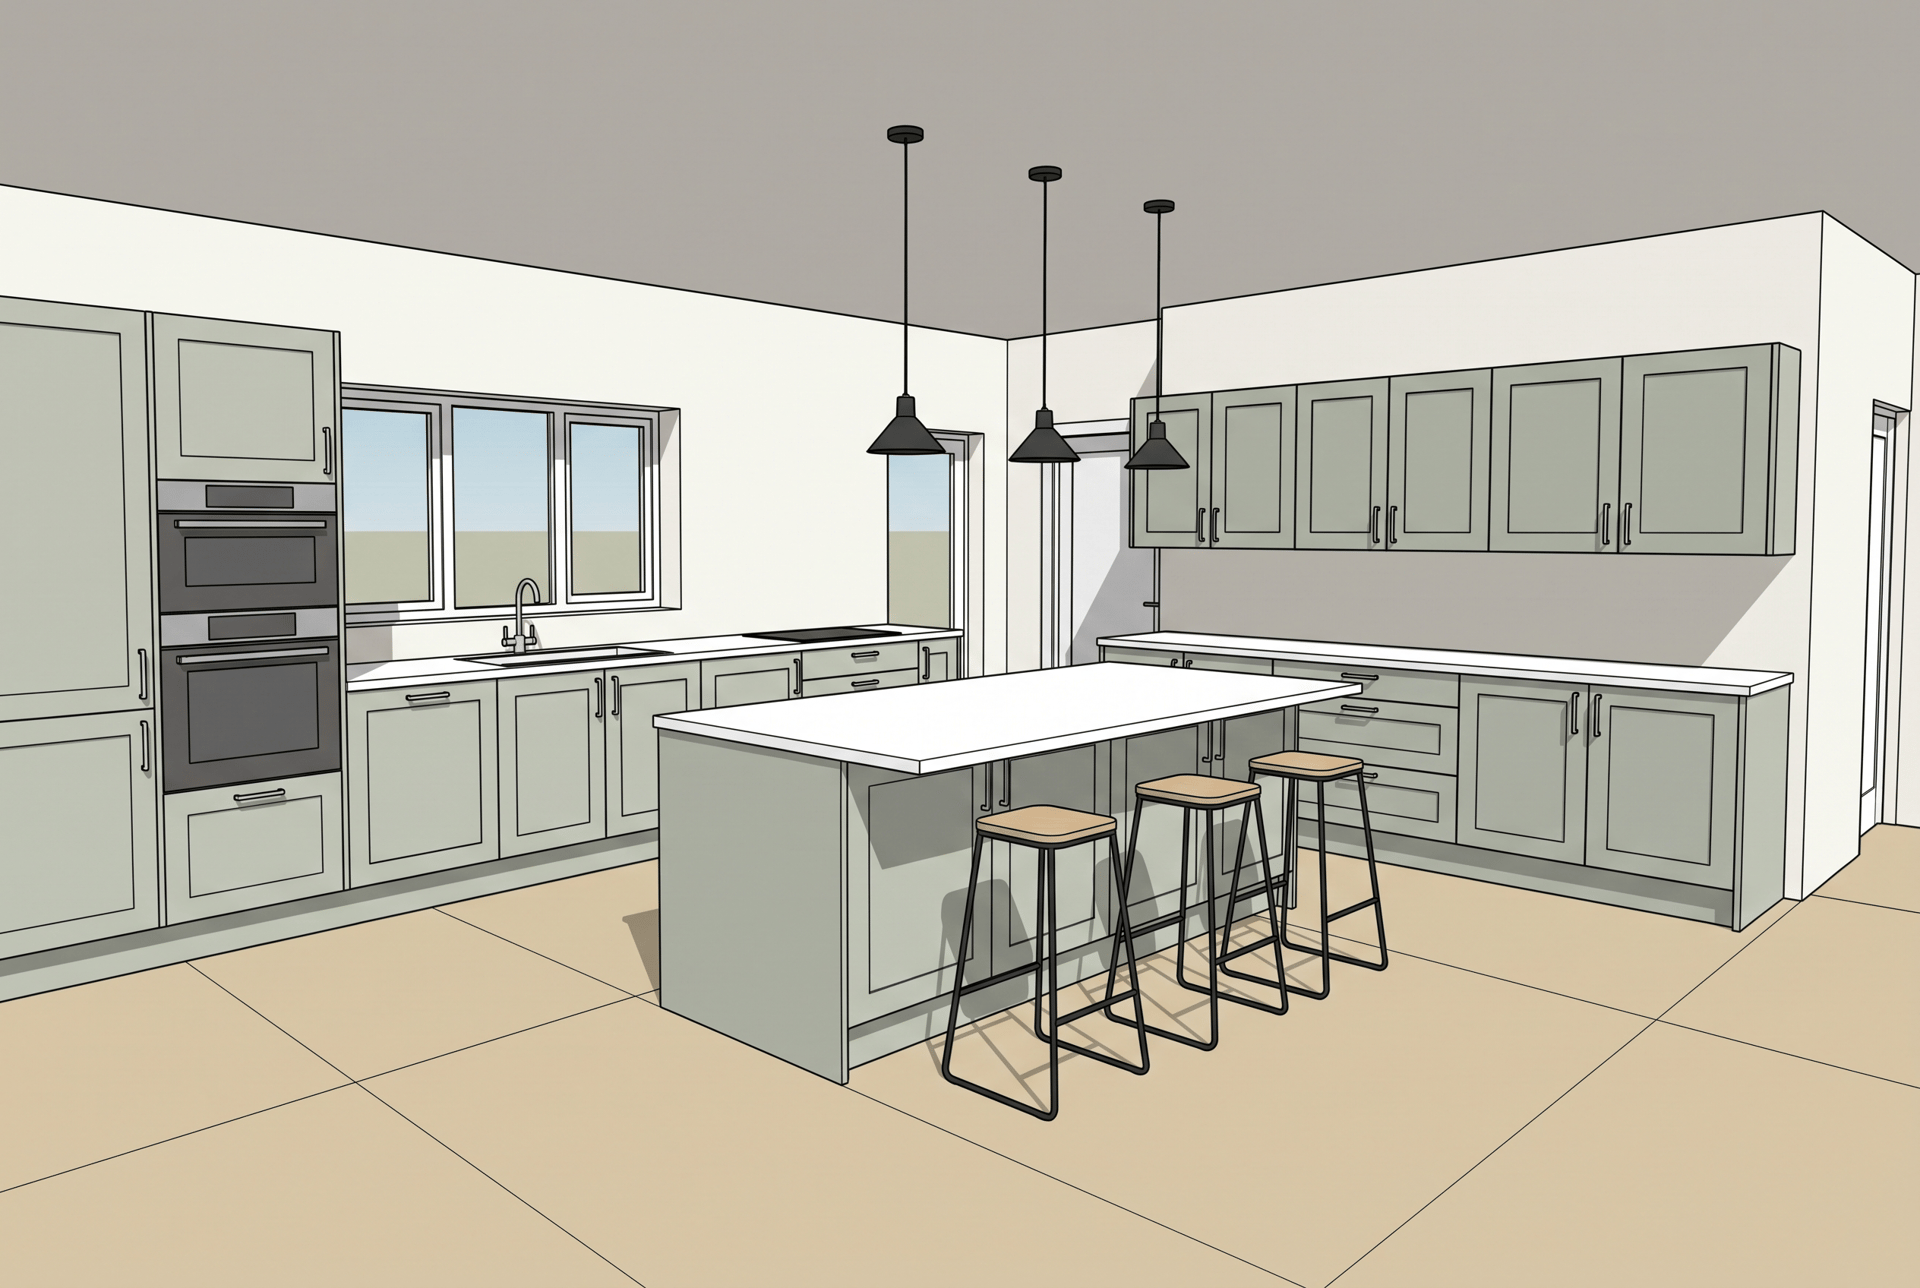
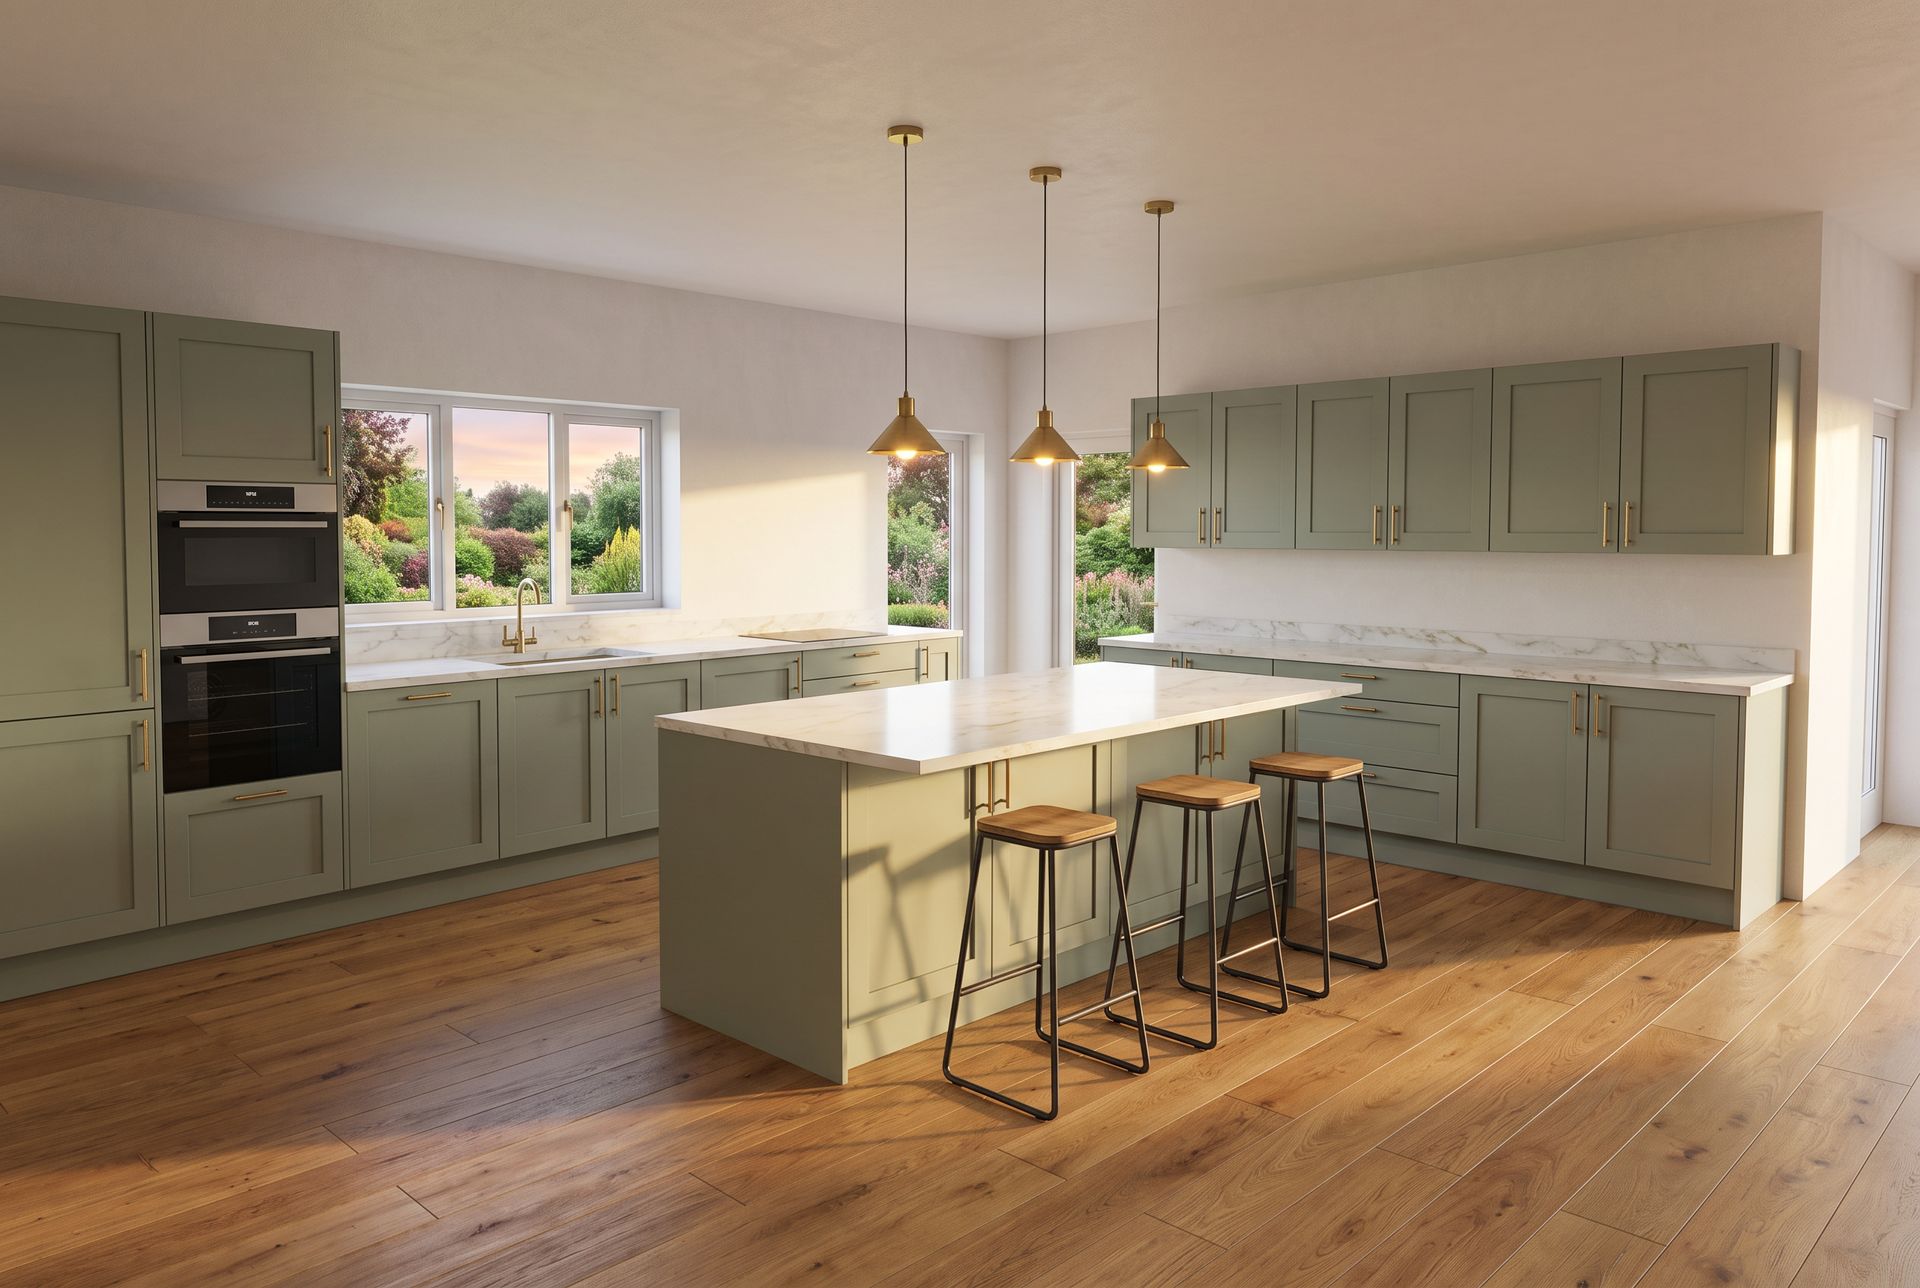
Result of the kitchen prompt with Nano Banana 2 at 2K, 15 tokens. Cabinets, ovens, island and stools stay in the same place.
How do I stop the AI from changing my design?
This is the most common problem with AI rendering. The AI sees a flat image, so if something is unclear, it fills the gap with its own idea. Use these fixes:
- Say it in the prompt. "Keep the exact geometry, layout and camera angle. Do not add or remove objects." Put it at the start.
- Remove ambiguity in the export. Empty rooms get furniture invented. If you do not want furniture, write "empty room, no furniture". If you do, model simple blocks where it goes.
- Describe the view outside. If you do not, the AI often fills the windows with a flat, fake looking sky. Add one line such as "View through the windows: a real green garden with trees and a soft blue sky."
- Name what matters most. "Keep the three windows on the left wall" works better than a general instruction.
- Simplify complex scenes. Busy interiors, stairs and facades with many openings are harder. Export one room or one facade at a time instead of the whole building.
- Generate several versions. Pick the one that respects the design and refine it, instead of fixing a bad version.
- Fix small details with a second edit. If one lamp is wrong, edit the result again with a short prompt, for example: "Replace the floor lamp with a slim black floor lamp. Change nothing else."
Here is a real example from this guide. In the first render of the living room, the AI added a glass door to the back wall, which is a solid wall in the model. One short second edit fixed it: "Remove the glass door on the back wall and make the back wall a solid, plain white plaster wall, as in the original model. Change nothing else in the image."
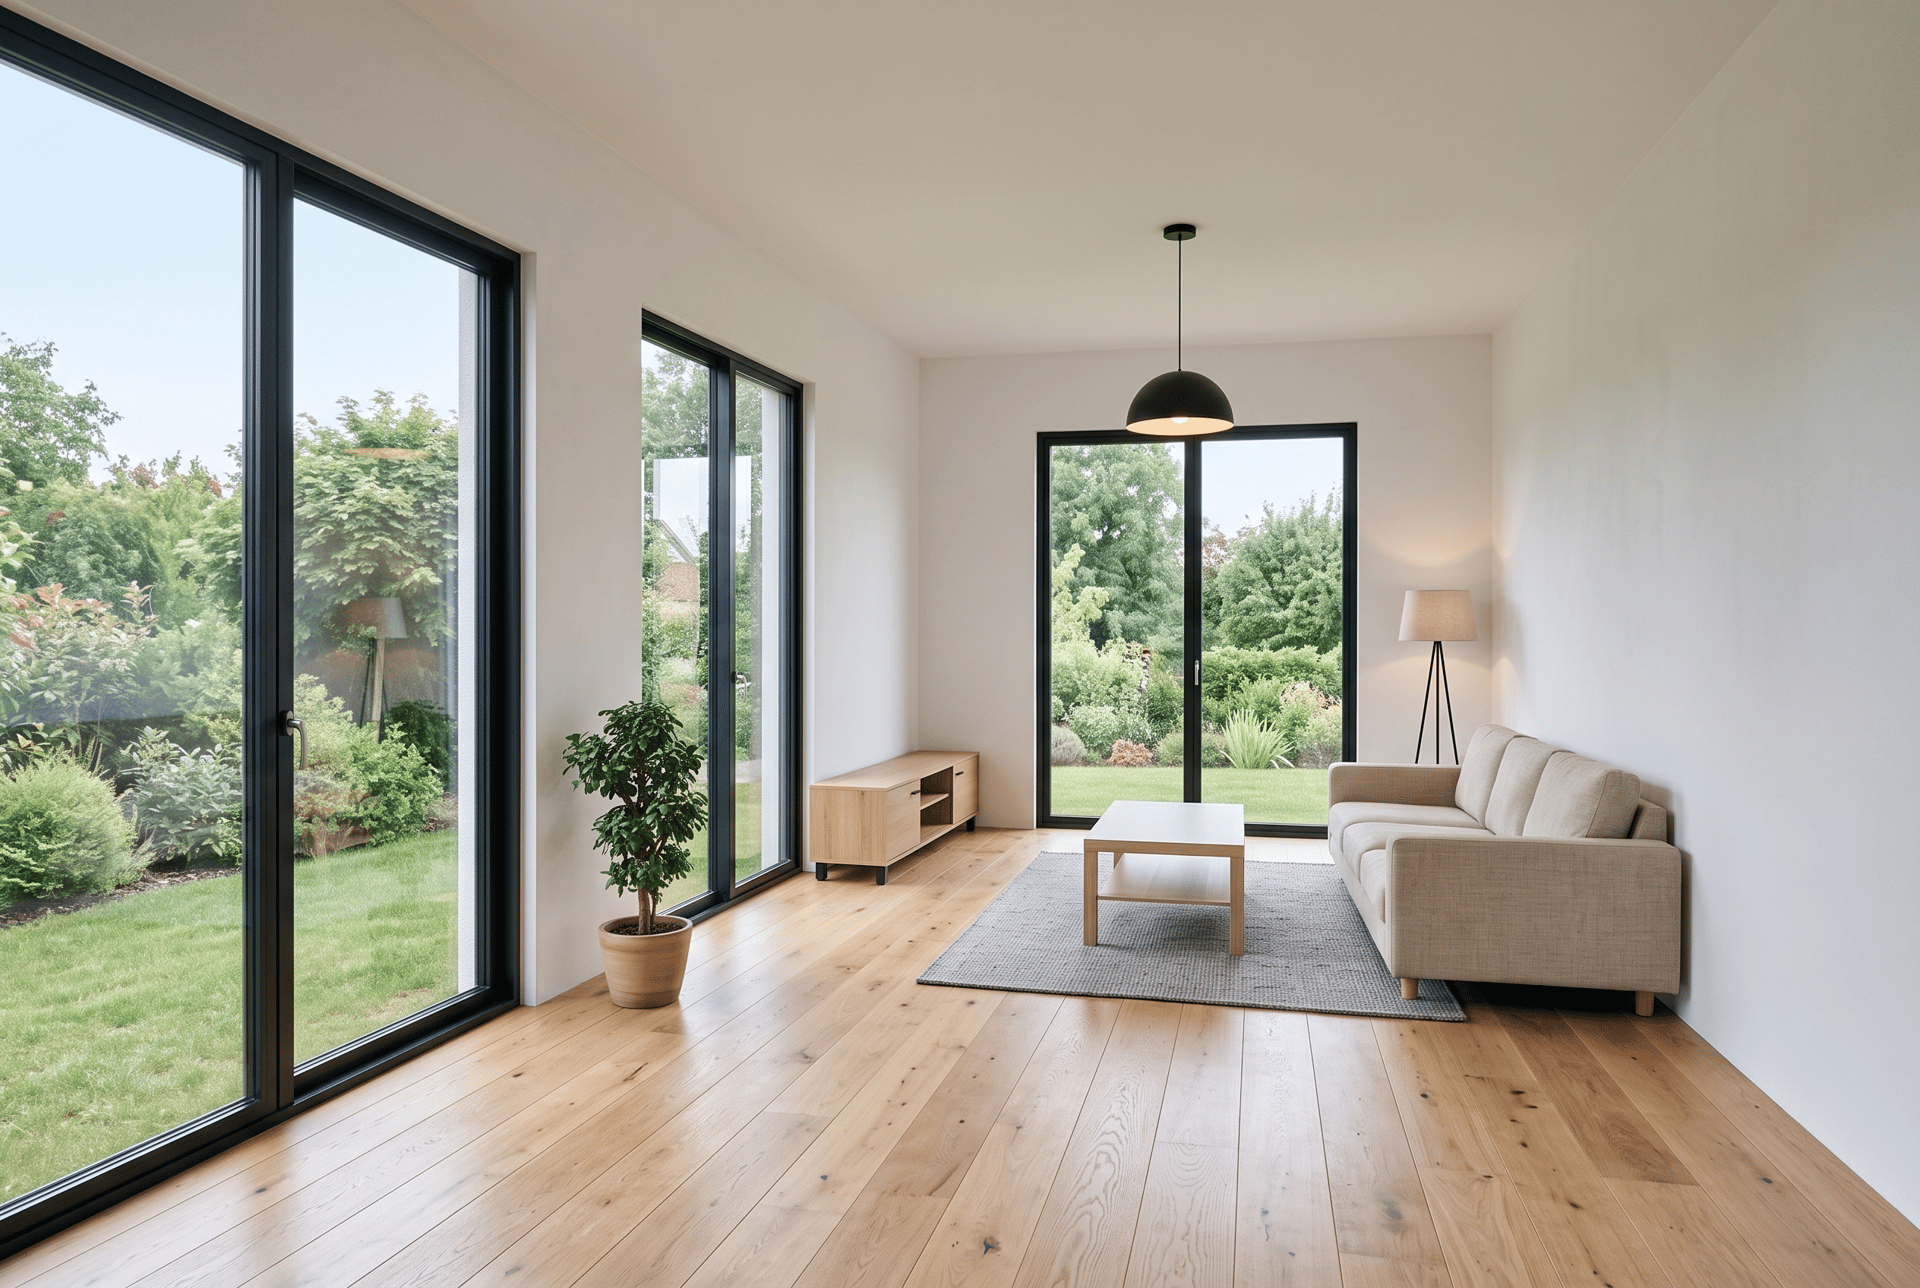
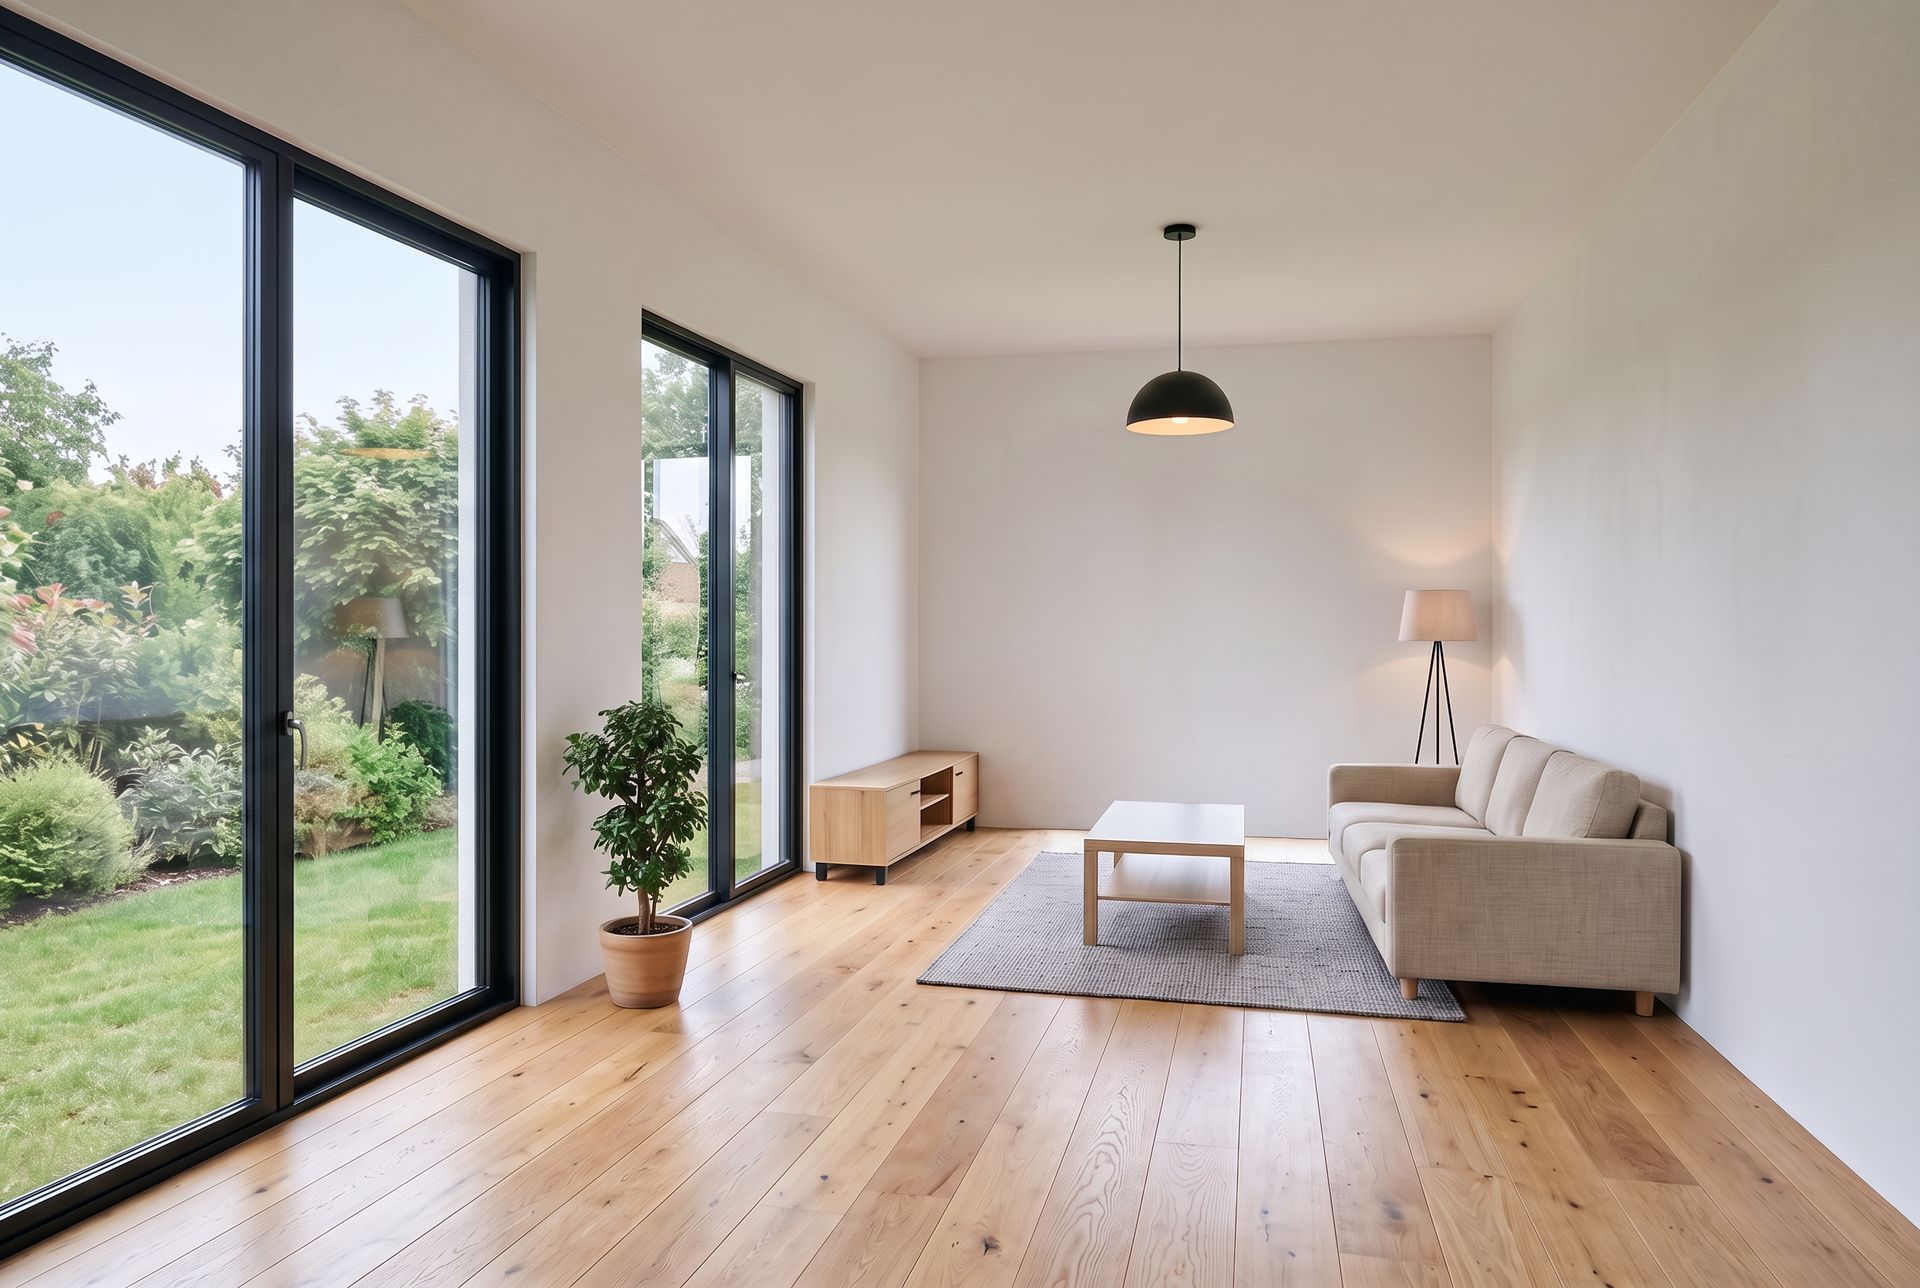
Look at the back wall, behind the pendant lamp. Left: The glass door the AI invented. Right: The same image after one short correction, with the wall solid as in the model. The floor, furniture, windows and light did not change. A correction like this costs 15 tokens and takes under a minute, so always compare the render with your model before you send it.
How do I get the same look in every view?
Clients notice when the living room is warm oak in one image and grey tile in the next. To keep a project consistent:
- Reuse the same prompt for every view and change only the room description.
- Keep the same time of day in the SketchUp shadows for every export.
- Upload a finished render as a reference image together with the new view, and ask the model to match its materials and light.
What else can I do with the render?
Once you have one good image, you can take it further in Lupa AI without going back to SketchUp:
- New camera angles: Angles generates other views of the same scene.
- Day to night: Relight changes the light to evening or twilight. See how to turn a daytime photo into an evening shot.
- Video for the client: Space Motion turns the render into a short cinematic camera move, ready for a presentation or Instagram.
What are the limits of AI rendering?
- It works from one image. Each view is a separate render, so small details can vary between views.
- Fine text and small patterns (signage, tile grids, specific fabric prints) are not always exact.
- Exact products are not guaranteed. If the client needs a specific chair model, check it in the result or add it with a reference image.
- Measured lighting. AI light looks real but is not a lighting simulation.
For most presentations, competitions and early design reviews, these limits do not matter. For final marketing renders of a finished project, many studios combine both: AI for fast options, a traditional engine for the final set.
Still have questions?
Does SketchUp have a built-in AI renderer?
Yes. SketchUp AI Render works inside SketchUp on Go, Pro and Studio plans. Each image costs 10 credits, and the plans include 100, 150 or 200 credits a month. You can buy more with the SketchUp AI add-on.
Do I need a plugin to render SketchUp with AI?
No. You can export a PNG from SketchUp (File, Export, 2D Graphic) and render it in a web tool like Lupa AI. This also works with screenshots from Revit, Rhino, ArchiCAD or a hand sketch.
Will the AI change my design?
It can if the view is unclear. Start the prompt with "Keep the exact geometry, layout and camera angle. Do not add or remove objects", export a clean view with basic materials and shadows, and generate 2 or 3 versions to pick the most faithful one.
How much does it cost to render a SketchUp model in Lupa AI?
An edit with Nano Banana 2 costs 10 tokens at 1K, 15 at 2K and 20 at 4K. Upscaling the result into a 4K photo with the Realistic mode of the Enhancer costs 45 tokens. A full presentation image costs about 60 tokens.
Can AI rendering replace V-Ray or Enscape?
For presentations, competitions and early design reviews, often yes. For exact, repeatable final renders of a whole project, a traditional render engine is still more reliable. Many studios use AI for fast options and a render engine for the final set.
What resolution should I export from SketchUp?
Export a PNG at least 1920 pixels wide. The AI works from that image, and you can upscale the final render to 4K or 6K in the Enhancer.